Waypoints
Frag Orders lets planners build and modify flight routes directly on the map or through the waypoint inspector. Changes are saved per-publish and merged on top of the original .miz route, so the source file is never modified.
Viewing Waypoints
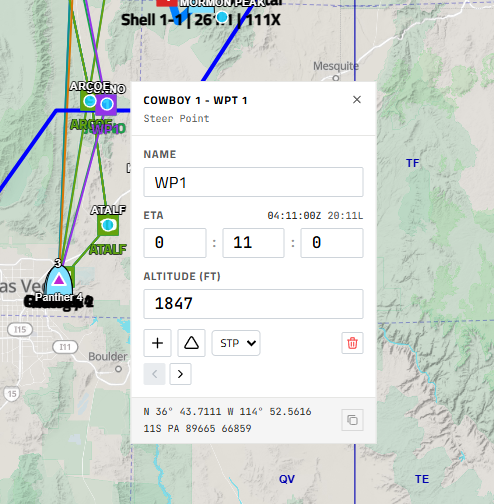
Open any frag order and navigate to the Map view. Click on a flight's route marker or waypoint diamond to open the hopup. The hopup shows:
- Altitude (feet)
- ETA from mission start
- Planned airspeed (KTS)
Flights you have planning access to show an editable form instead of read-only data.
Editing a Waypoint
Click a waypoint on the map to select it. If you have planner access to that flight, the hopup shows editable fields:
- Name — free-text label for the waypoint (e.g.
IP,TGT,EGRESS) - ETA — time from mission start in HH:MM:SS; shown as both Zulu and local time
- Altitude (ft) — MSL altitude in feet
Changes save automatically when you tab or click away from a field. The waypoint type (STP, IP, or TGT) can be changed with the dropdown at the bottom of the form — this controls how the waypoint marker is rendered on the map.
Navigating Between Waypoints
Use the ◀ ▶ buttons at the bottom of the hopup to step forward or backward through the route without closing the panel. The map pans to each waypoint as you navigate.
Dragging Waypoints
Waypoints can be repositioned by clicking and dragging the marker on the map. The new coordinates are saved when you release. Drag only moves the position — ETA and altitude are unchanged.
Adding a Waypoint
Click on a flight's group marker on the map to open the flight hopup. Use the + (Add Waypoint) button to enter placement mode — the cursor changes to indicate you are placing a new waypoint. Click anywhere on the map to drop the waypoint at that position. Right-click or press ESC to cancel.
The new waypoint is inserted after the last existing waypoint in the route. Its number, ETA, and altitude default to zero and can be edited immediately in the waypoint hopup.
Importing a Route from Another Flight
If you want to copy a route from another flight in the package — for example, giving a wingman the same plan as flight lead — click the Import WPs button (↓↕ icon) on the flight hopup.
A dialog opens with a dropdown showing all flights that have planned waypoints. Select the source flight and click Import. The target flight's entire planned route is replaced with the source flight's waypoints. This operation is atomic — if anything fails, no changes are written.
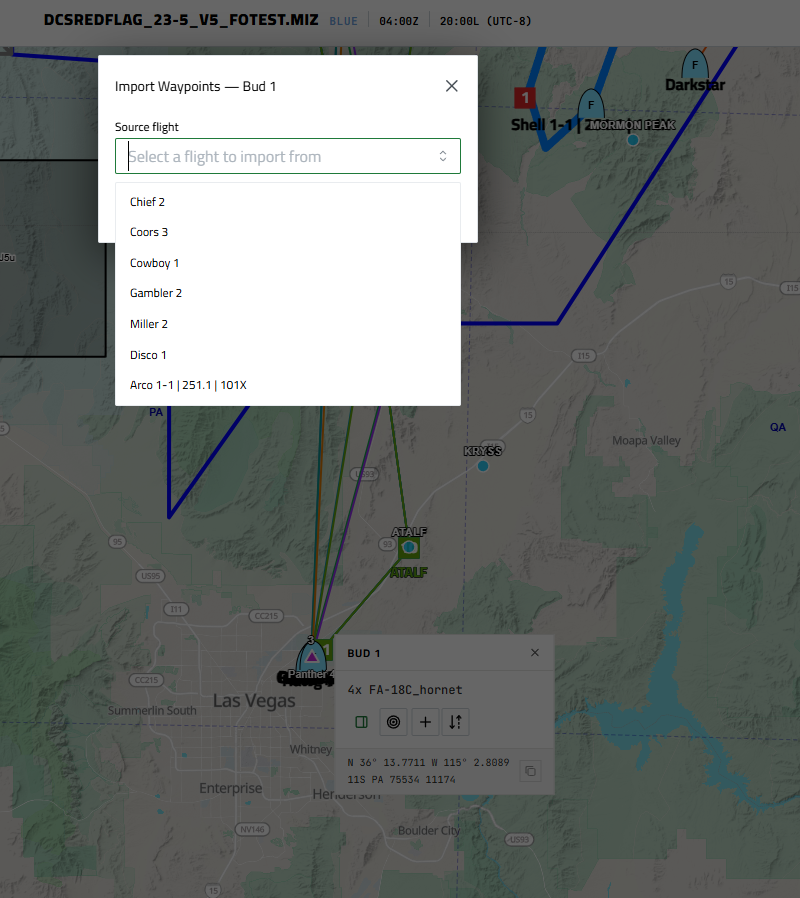
Import replaces the target flight's current route. There is no undo — re-import from the original flight if you need to revert.