Data Transfer Cartridges (DTC)
The DTC page in a frag order is your one stop for Data Transfer Cartridges. From here you can inspect the cartridges already in the mission, create or upload your own, and push your map drawings and routes into a cartridge so pilots load them in-cockpit exactly as planned — no manual point entry required.
Everything you add is written into the exported .miz under the mission's DTC/ directory. As with all packaging, the original .miz you uploaded is never modified — cartridges are only injected into the downloaded copy.
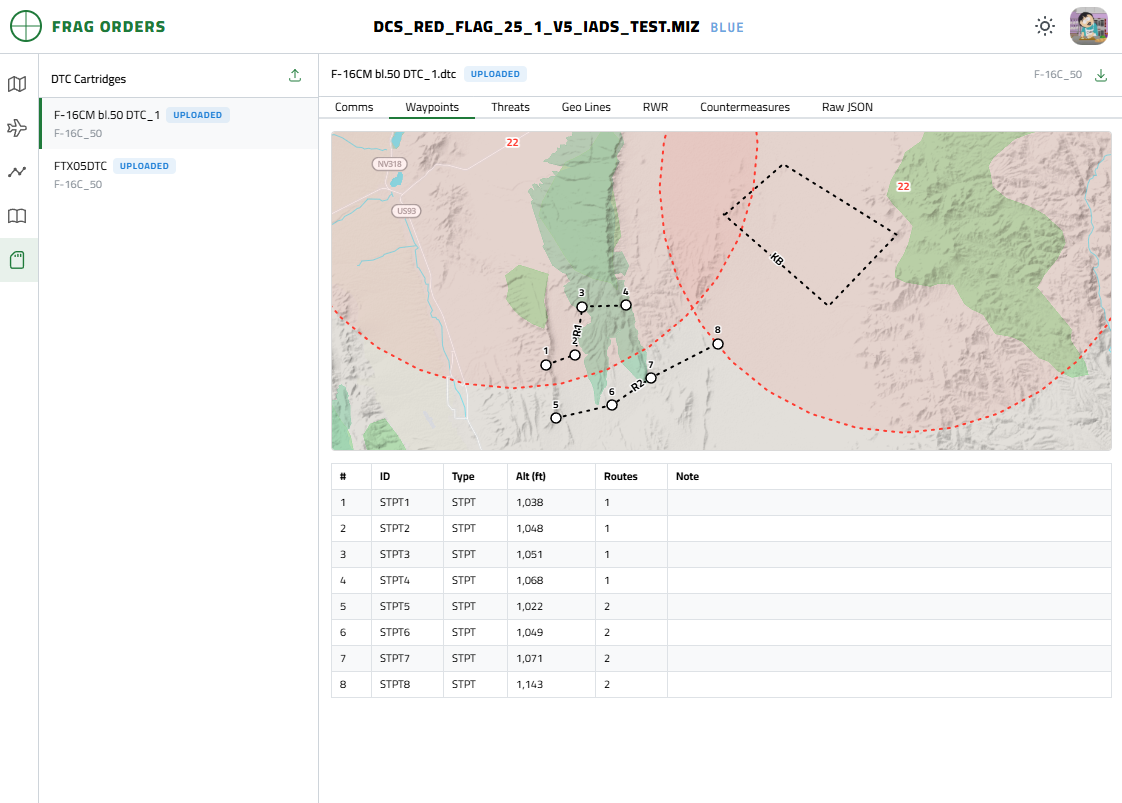
Opening the DTC View
Open the DTC item in the publish navigation. The left pane lists every cartridge; selecting one opens its inspector on the right.
Two kinds of cartridge show up:
- Mission cartridges (gray badge) are embedded in the uploaded
.mizby the mission author. Editors can move supported points and vertices; the first edit saves an uploaded cartridge with the same name, which takes precedence over the mission copy. - Uploaded cartridges (blue badge) are ones you added through Frag Orders, either by uploading a
.dtcfile or by creating a new one. These are fully editable.
If a mission cartridge and an uploaded cartridge share the same file name, the uploaded one takes precedence and hides the mission copy.
Managing cartridges requires the Editor (or Owner) role. DTCs are mission-wide rather than tied to a single flight, so individual group planners cannot create, upload, edit, or delete them.
Creating a New Cartridge
You don't need the mission author to pre-seed a cartridge — you can synthesize a fresh, empty one for any supported airframe.
- Click the + (New cartridge) button in the list header.
- Pick the airframe — F-16C Viper, F/A-18C Hornet, F-14B Tomcat, or AH-64D Apache.
- Give it a name and click Create.
The new cartridge is a clean, valid DCS-DTC cartridge with no waypoints, threats, or routes yet — ready to receive your map content on export. Its terrain is stamped automatically to match the mission, so it always loads on the right map.
Uploading Cartridges
To bring in a cartridge built elsewhere:
- Drag one or more
.dtcfiles anywhere onto the DTC list pane, or click the upload button in the list header. - Frag Orders validates each file. A file that isn't valid DTC JSON is rejected with an error.
- The cartridge is saved and appears at the top of the list with an uploaded badge.
Re-uploading a file with the same name replaces the previous version.
Terrain Must Match
A cartridge is rejected if its terrain doesn't match the frag order's theater. This prevents loading, say, a Syria cartridge into a Caucasus mission where its coordinates would be meaningless. (Cartridges you create in Frag Orders are always stamped with the correct terrain.)
Assigning a Cartridge to Aircraft
Assign a cartridge to a flight when you want DCS to make it available to those aircraft in the packaged mission. You can assign one cartridge to an entire flight or give individual flight members different cartridges.
From the DTC View
- Select the cartridge you want to assign.
- Under Assign cartridge, select one or more flights. Frag Orders only lists flights whose aircraft type matches the cartridge's airframe.
- Select Entire flight or a specific Flight member.
- Click Assign.

The selectors show the cartridge's current assignments from the server. When the cartridge is assigned to several whole flights, all of those flights are selected. When the same flight-member position is assigned across several flights, the member selector shows that position.
If the selected flights have a mixture of whole-flight and individual-member assignments, the affected flights remain selected but the member selector is blank because no single member choice represents the current state.
Assigning a cartridge to an individual member changes only that member. Existing assignments for the other members of the flight are preserved, so a four-ship can use four different cartridges if needed.
From the Roster
You can also assign cartridges while working with a flight in the roster:
- Open the flight from the Roster.
- Open its Avionics controls and select DTC.
- Use the flight dropdown to assign one cartridge to every member, or use the member dropdowns to assign aircraft individually.
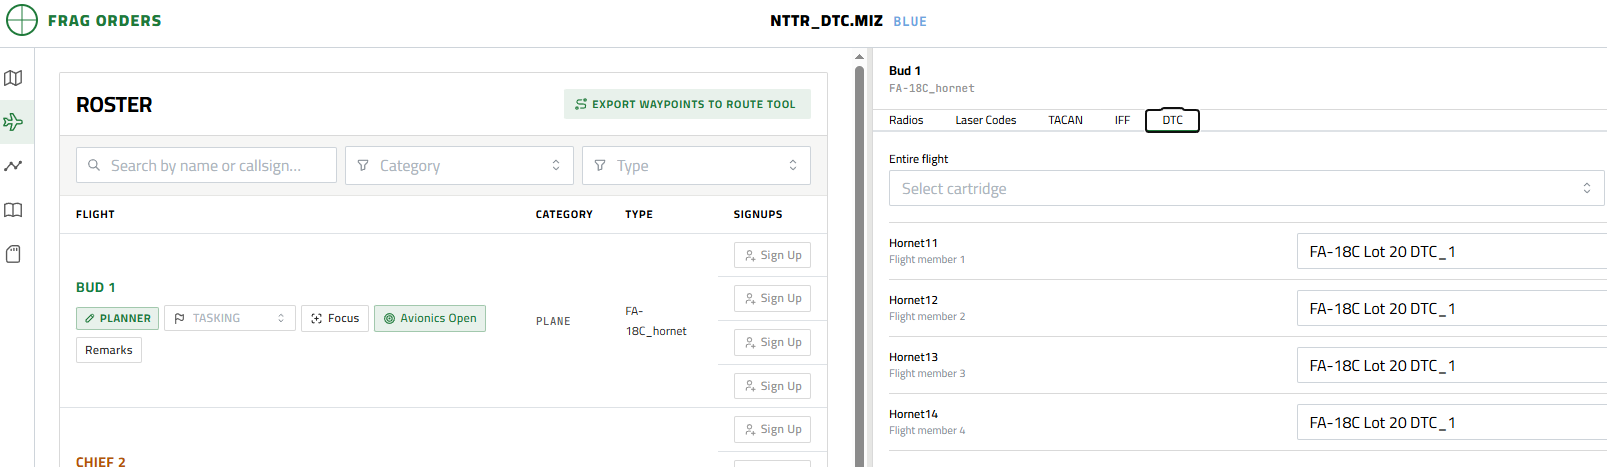
Only cartridges matching the flight's aircraft type are offered. Existing assignments are shown in the dropdowns, so you can verify or change the flight without returning to the DTC page.
What Gets Packaged
When you download the packaged .miz, Frag Orders writes uploaded cartridges into its DTC/ directory and updates each assigned aircraft to reference its cartridge. An entire-flight assignment gives every aircraft in that flight the same cartridge; an individual assignment changes only the selected member. Assigned cartridges are configured to load automatically in supported aircraft.
Changing an assignment does not alter the original mission file. The assignment is applied only to packaged downloads.
Inspecting a Cartridge
The inspector splits a cartridge into tabs, and only shows the tabs that actually contain data. Depending on the airframe you may see:
- Comms — radio presets
- Waypoints — nav points, with a mini-map
- Threats — threat points and their rings, with a mini-map
- Geo Lines — lines and shapes drawn on the moving map, with a mini-map
- JDAM — pre-planned aimpoints (F-14B)
- RWR — radar-warning receiver programming
- Countermeasures — chaff/flare programs
- Raw JSON — the full cartridge, always available
The parsers are airframe-aware, so an F-16 cartridge (MPD / ELINT) and an F/A-18 cartridge (WYPT / SA / ALR-67) are each broken down using the right fields.
Every cartridge — mission or uploaded — can be downloaded as a .dtc file using the download button in the view header.
Sending Map Content to a Cartridge
Beyond what a cartridge already holds, Frag Orders can inject your map drawings and flight routes into it on export. These appear as extra preview tabs at the top of the DTC inspector — each with a mini-map — so you can verify exactly what will be written before packaging.
Two rules apply to every drawing you export:
- The drawing must be on the Shared layer. Export targets are disabled for personal drawings, since a cartridge is shared by everyone flying that airframe. Sharing requires the Drawing Editor permission; see Drawing Access Rules.
- A target cartridge must exist. Any cartridge — mission-embedded, uploaded, or one you created — can be a target.
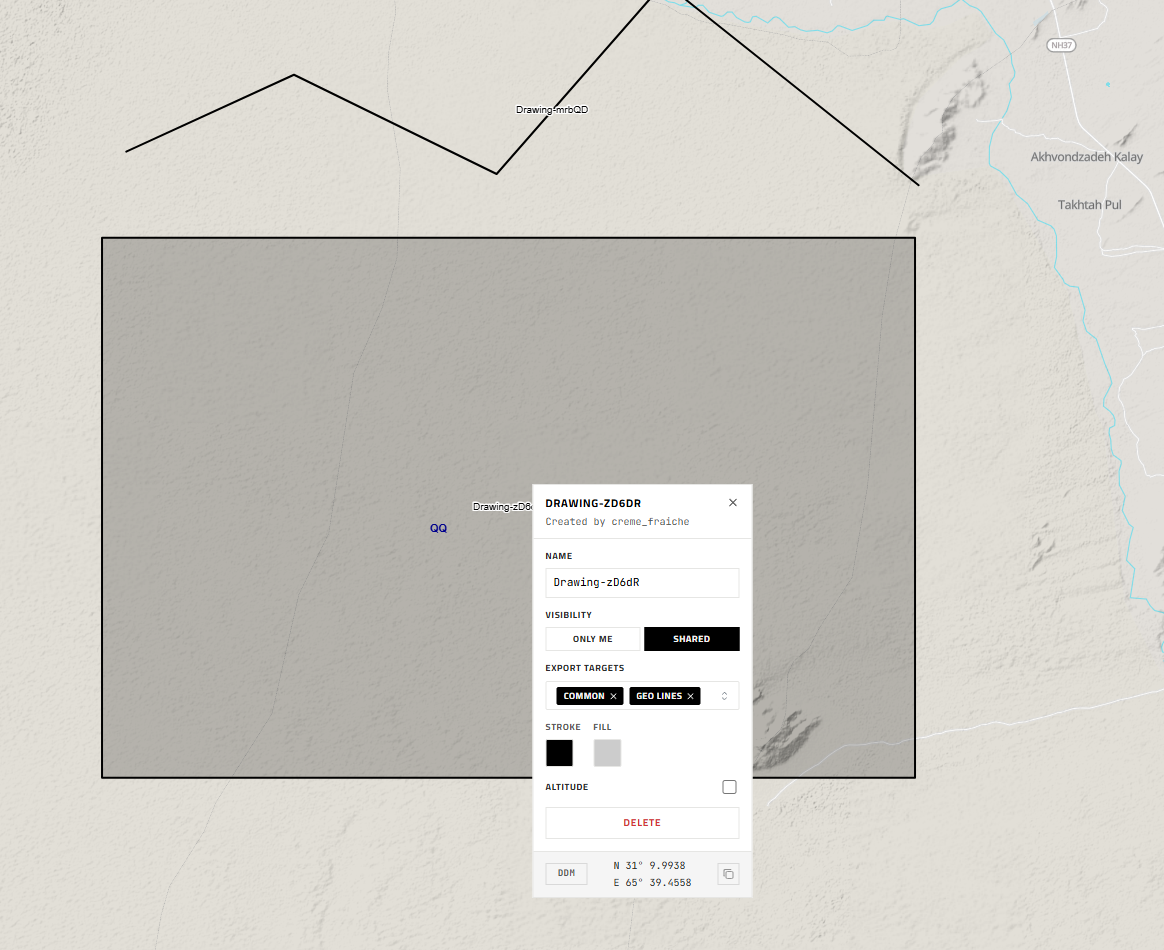
Assigning an Export Target
- Draw the shape on the map and set its visibility to Shared.
- Click the drawing to open its details popover.
- Under Export Targets, open the dropdown. Each cartridge in the mission appears as its own group with the options valid for that shape.
- Select the cartridge(s) you want this drawing written to. A drawing can target multiple cartridges (and Miz Layers) at once.
Selections save immediately — there is no separate confirm step.
What Each Shape Becomes
| Draw this | It exports as | Where it lands |
|---|---|---|
| Line or polygon | Geo Line | Cartridge geo-line slots (L1–L4) |
| Circle | Threat ring | F-16 threat points / F/A-18 MEZ |
| Point | Standalone point | F-16: DEST destination · F/A-18: GPS waypoint · F-14B: JDAM aimpoint |
| Route (Route tool) | Flight route / steerpoints | Route partitions R1 / R2 / R3 |
Geo Lines
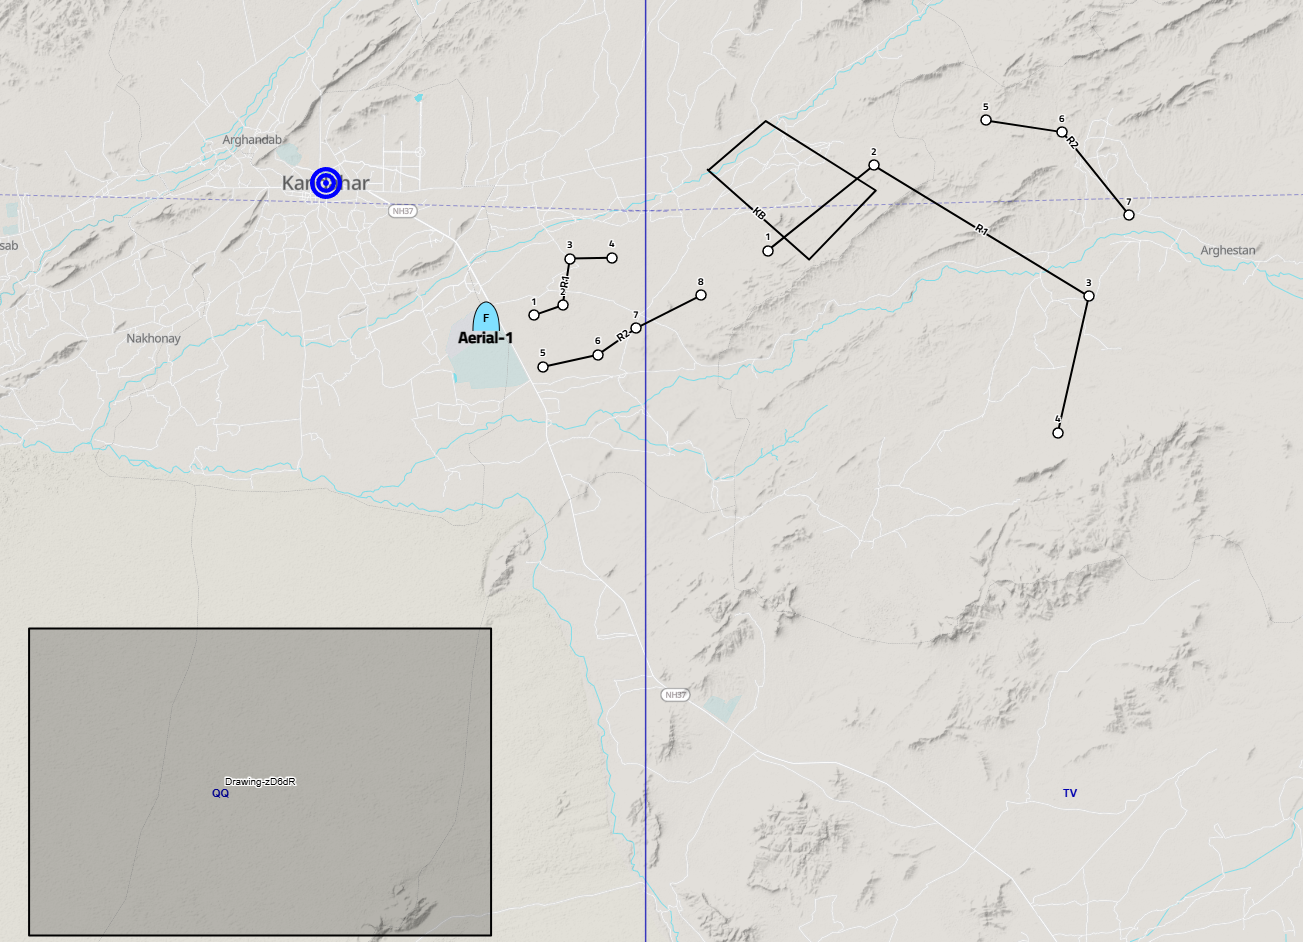
Lines and polygons land in the cartridge's Geo Lines slots and show up on the aircraft's moving map. Each drawing occupies one of the four slots (L1–L4); slots already used by the mission author are skipped, so you can add up to four Frag Orders geo lines per cartridge without disturbing existing ones. The drawing's label becomes the note on the first point, and altitude (if set) is carried through in feet.
Threat Rings
A circle becomes a threat ring — an F-16 threat point or an F/A-18 MEZ threat — with its radius carried through. On the F-16 the on-MFD label is clamped to two characters (all the threat-point display supports); the full name is kept alongside it.
Standalone Points
A point exports as a stand-alone, off-route point: a DEST destination on the F-16, a GPS waypoint on the F/A-18, or a pre-planned JDAM aimpoint on the F-14B. The option shown depends on the target cartridge's airframe. Points are not written as steerpoints — steerpoints come from routes.
Routes
A route drawn with the Route tool exports as a flight route into a cartridge's route partitions (R1 / R2 / R3). See Planning a Route below.
AH-64D Apache
Frag Orders can create, inspect, display, edit, and package AH-64D Apache cartridges. Apache cartridge points, routes, lines, areas, PFZs, and NFZs appear on the main planning map and in the DTC inspector.
Apache Points
Create a shared point drawing, select the Apache cartridge's point export target, and use one of these exact label formats:
| Drawing label | Apache partition | Valid slots | DTC display text |
|---|---|---|---|
WP01 | Waypoint/Hazard (WPTHZ) | 01–50 | W01 |
HZ01 | Waypoint/Hazard (WPTHZ) | 01–50 | H01 |
CM51 | Control Measure (CTRLM) | 51–99 | C51 |
TG01 | Target (TGT) | 01–50 | T01 |
Labels are case-insensitive, but they must contain the two-letter prefix and a two-digit slot number. Each point's map altitude is converted from meters to feet when written to the cartridge. Duplicate labels targeting the same partition and slot are rejected during packaging.
For target points, add an optional Apache identifier after a colon. For example, TG01:S6 writes target slot 01 with display text T01 and the S6 air-defense identifier. Other valid Apache target identifiers, such as SA10, work the same way. Identifiers are case-insensitive; unknown identifiers are rejected rather than silently written as a generic target.
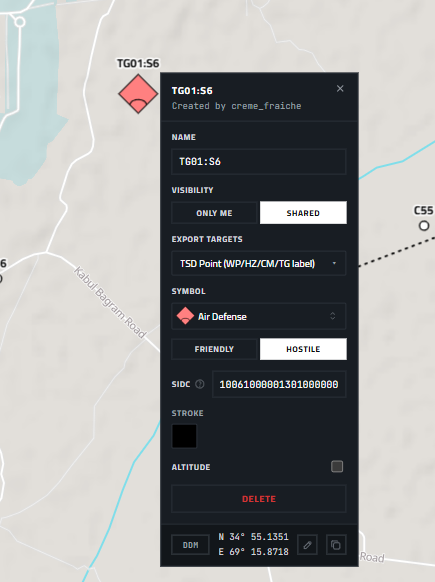
In TG01:S6, TG01 selects target slot 01 and S6 populates the Apache IDENT. The point is shown as T01 in the cartridge while retaining S6 as its tactical identifier.
Use the drawing label CM54, not C54. Frag Orders uses CM to select the Control Measure partition, then writes the Apache display label as C54.
Apache Routes and Shapes
Routes can be assigned to any of the ten Apache route partitions: ALPHA, BRAVO, DELTA, ECHO, HOTEL, INDIA, LIMA, OSCAR, ROMEO, or TANGO. Route vertices are allocated from the shared waypoint slots 01–50, skipping slots already occupied in the cartridge.
Apache drawing export options depend on the geometry:
| Draw this | Apache export option |
|---|---|
| Point | Waypoint, Hazard, Control Measure, or Target |
| Line | Line |
| Polygon | Area, PFZ, or NFZ |
Circles are not offered as an Apache export type. Polygon closing vertices are normalized when written, so the cartridge does not receive a duplicate final vertex.
Planning a Route
Use the dedicated Route tool (in the map's drawing toolbar) to build a flight route: a series of numbered waypoints you edit like a flight plan. Routes are always shared with everyone flying the mission, so only Editors can create and edit them.
Select the Route tool and click along the map to drop waypoints; double-click or right-click to finish. Click any waypoint to open its editor:
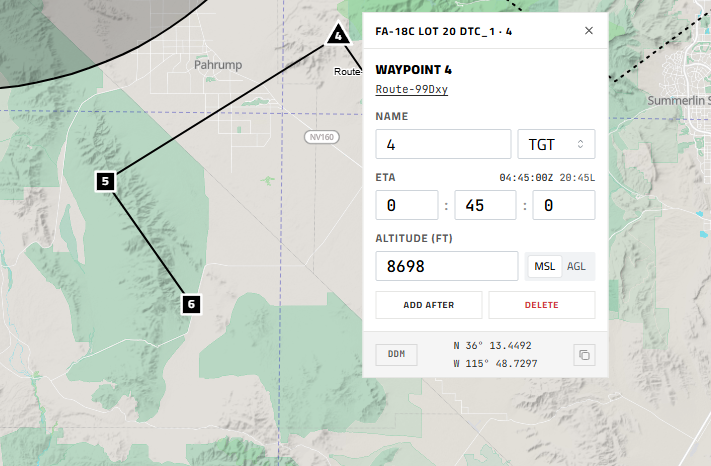
- Name — a label for the waypoint.
- Type — Steerpoint, IP, or Target. The map marker is shaped by type: a square for steerpoints, a circle for IPs, and a triangle for targets.
- ToT — the time-on-target for the waypoint.
- Altitude — MSL. New waypoints start at the ground elevation beneath them, so the value begins sensible.
- Add After / Delete — insert a new waypoint after this one, or remove it.
Grab and drag any waypoint to reposition it — the route line follows as you move it.
To send the route to a cartridge, click the route line itself and choose a partition — R1, R2, or R3 — under Export Partitions. Each waypoint becomes a steerpoint on that route, waypoints typed TGT are flagged as targets, and each waypoint's ToT is written to the cartridge.
Editing Points on the Map
The Waypoints, Threats, and Geo Lines tabs each render a mini-map for the cartridge. Editors can drag supported points directly:
- Nav points and geo-line vertices can be dragged to a new position.
- Only existing points move — you can't insert a new vertex partway along a line.
- Threat rings and derived route lines are display-only.
Each drag re-serializes the entire cartridge and saves it. The map holds the point at its new position until the save lands, so it won't flicker back. A success or error notification confirms the result. DTC lines are drawn dotted, matching how they appear on the aircraft's moving map. Editing a mission cartridge creates an uploaded cartridge with the same name, leaving the original mission file unchanged.
In the .miz File
When you download a packaged .miz from the Publish page, every uploaded cartridge — plus all the drawings and routes you targeted at it — is written into the mission's DTC/ directory, so pilots find them in the in-cockpit DTC menu. Mission-embedded cartridges are left as the author saved them.
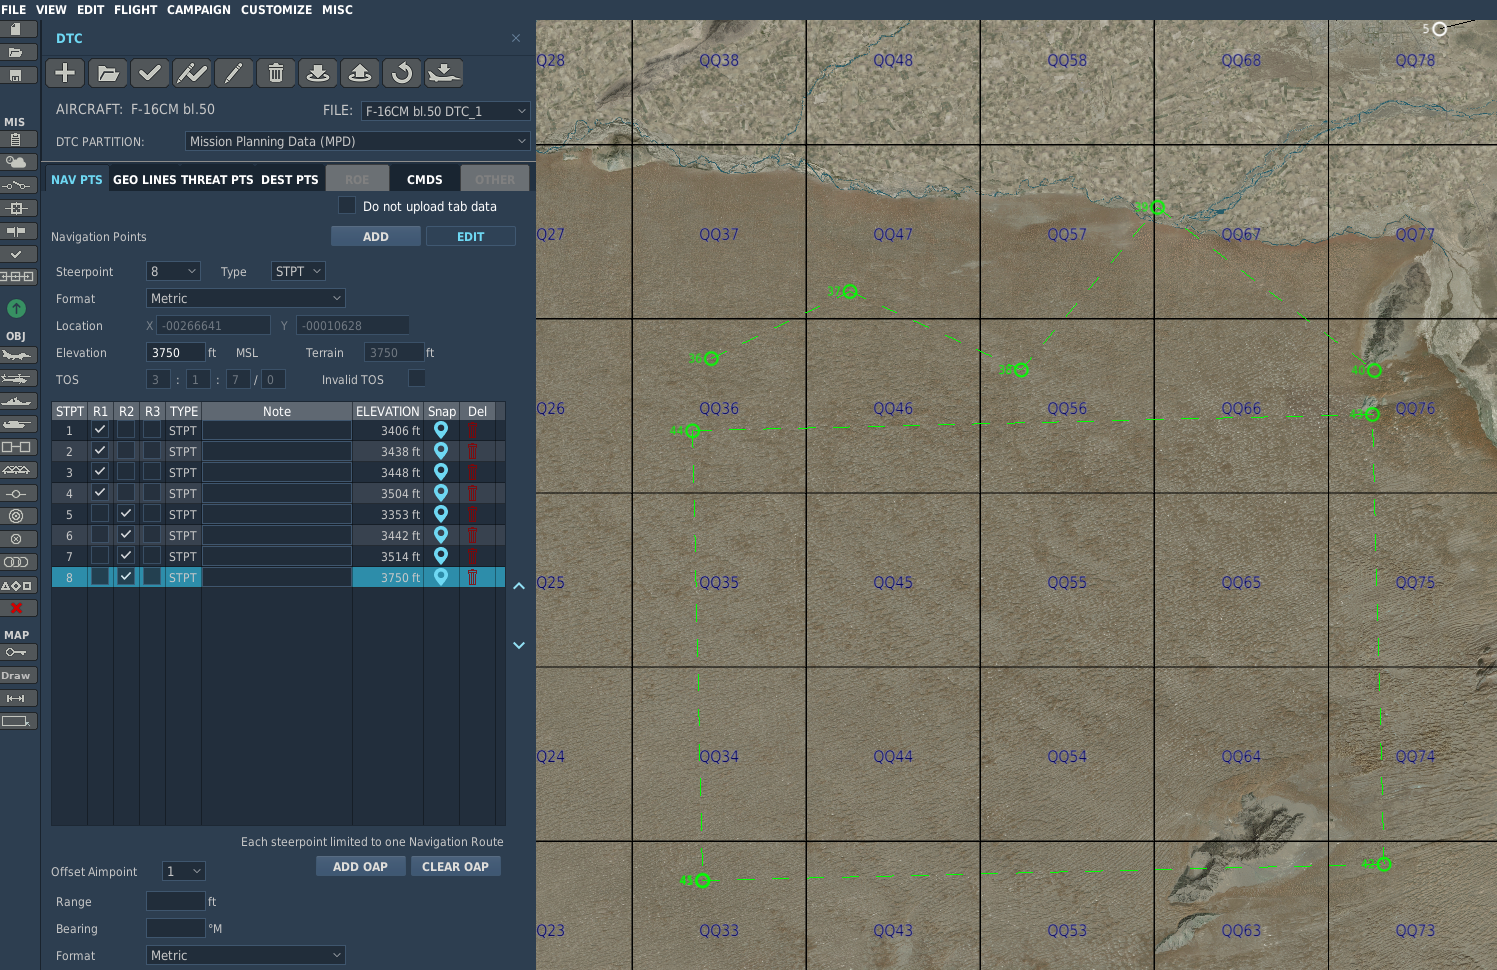
DTC Geo Lines are distinct from the mission's F10-map drawing layers. If you want a shape to appear both on the F10 map and in the cartridge, assign it a Miz Layer target (Common, Author, Blue, or Red) and a DTC target.
Only four geo-line slots (L1–L4) exist per cartridge. If existing geo lines plus your Frag Orders drawings exceed four, the extra drawings are skipped during packaging.
Deleting an uploaded cartridge only removes it from Frag Orders and future packaged downloads. It has no effect on cartridges the mission author embedded in the original .miz.